
This is a complete from-scratch raycasting engine, originally written in plain JavaScript and now fully ported to TypeScript with static typing, minor refactors, and a few quality-of-life improvements. The original implementation can be found here. I've embedded the engine directly on this page so you can try it instantly, no extra clicks required.
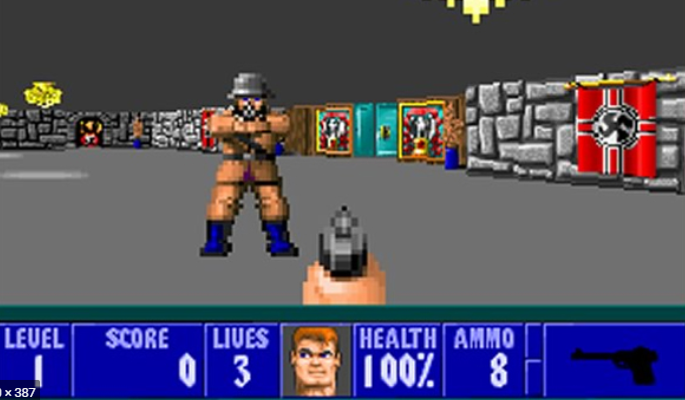
Raycasting is a technique to create a 3D projection onto a 2D plane. Older games used this because computers were not powerful enough for full 3D rendering. The first popular 3D game, Wolfenstein 3D, used this technique. Doom used a similar technique called binary space partitioning (BSP) to sort the render order of surfaces.
We will use JavaScript with HTML5. It is accessible and quick to prototype. You also don't need many resources for this, so a text editor and a web browser will be sufficient.
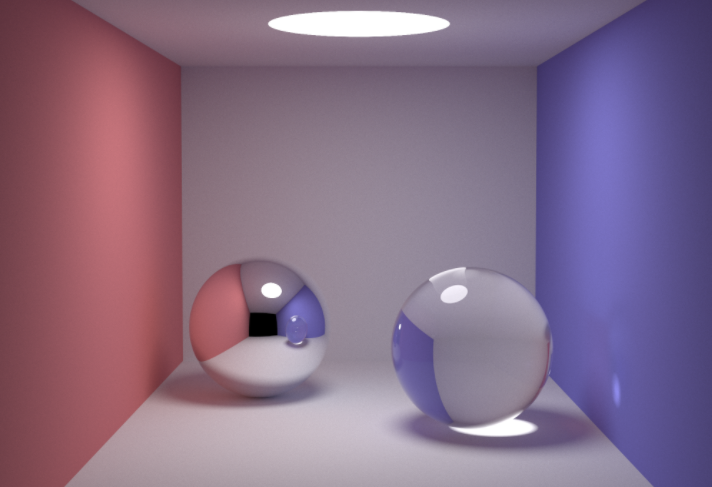
Also, do not confuse raycasting with ray tracing. Raycasting is a specific rendering technique, whereas ray tracing is a broader concept. Ray tracing determines the visibility of surfaces by tracing imaginary rays of light from the viewer's eyes to objects in the scene.
The differences between the two:
Raycasting:
- Fast and can be used for low performance devices
- Not realistic, this works with "blocks"
- Can process simple geometric shapes only
- The result image is stored on RAM
- Easy to implement
Ray tracing:
- Slow for the amount of processing it needs to calculate
- Realistic, every canvas pixel needs to be calculated
- Can render almost every shape
- The result is generally stored on disk memory
- Complex to implement
Logic
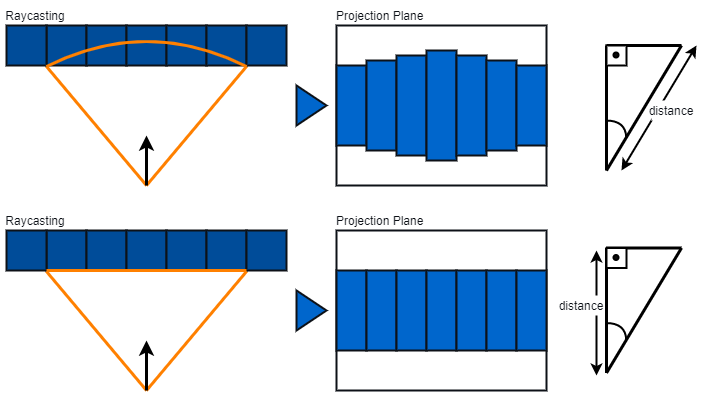
Raycasting is a 3D projection of a 2D map. We will transform a number matrix (map) into a projection (screen) using the raycasting method. Basically, you cast rays in the direction of the player's view. You do this to find the walls of the map and check the distance to the wall to calculate the height of the line we need to draw on the canvas. The map will be an integer matrix with 1 or 0 values. 0 represents empty space, and 1 represents a wall.
The projection will be drawn on the screen from left to right. Every ray corresponds to an x-axis slice of the screen. So, if you have a screen that is 640x480, you will need to cast 640 rays to project the result.
For each ray you cast, you will need to calculate its direction to iterate through the positions of this ray and find a wall. The initial ray position starts from the player's position and moves forward relative to the player's FOV.

Steps
Raycasting is seperated into these steps below to organise the implementation of it:
- Define a ray angle in relation of the player FOV
- Create a ray loop. The loop will iterate the width of the screen
- Get the
sinandcosof the ray angle to discover the numbers to increment to follow forward with the ray - Create a loop to check if the position of the ray is a wall, if not a wall increment with sin and cos values and check again
- After finding a wall, calculate the distance between the player coordinates and the ray coordinates using the Pythagorean theorem.
- Calculate the wall height by dividing the screen's half-height by the distance.
- Draw the "ceiling" line from the top of the screen to the top of the wall.
- Draw the "wall" line based on the calculated wall height.
- Draw the "floor" line from the bottom of the wall to the bottom of the screen.
- Repeat this process for every ray.
Basically, we are drawing lines. That's it.
Files
We will use html and js to create this, so we need two files, raycasting.html and raycasting.js
<!DOCTYPE html>
<html lang="en">
<head>
    <meta charset="UTF-8">
    <meta name="viewport" content="width=device-width, initial-scale=1.0">
    <meta http-equiv="X-UA-Compatible" content="ie=edge">
    <title>RayCasting Tutorial</title>
</head>
<body>

</body>
<script src="raycasting.js"></script>
</html>
Attributes
Lets define some attributes that will be used to create the projection
| Attribute | Description | Value |
|---|---|---|
| Screen width | The width of the screen | 640 |
| Screen height | The height of the screen | 480 |
| Screen half width | The screen width divided by 2 | Screen width / 2 |
| Screen half height | The screen height divided by 2 | Screen height / 2 |
| Render delay | The delay time for every render iteration | 30 milliseconds |
| Player FOV | The field of view of the player. Typically, games use 60. (Humans have ~90, but 60 is preferable visually for 2D screens.) | 60 |
| Player half FOV | Field of view divided by 2 | Player FOV / 2 |
| Player X | The player's x coordinate | 2 |
| Player Y | The player's y coordinate | 2 |
| Player angle | The angle for the player's view direction | 90 |
| RayCasting increment angle | The value to increment the ray angle for each column in relation to screen width | Player FOV / Screen width |
| RayCasting precision | Granularity of ray steps for wall detection (higher value = more precision, more iterations) | 64 |
| Map | The integer matrix that defines the level layout. Must be surrounded by walls to prevent out-of-bounds errors. | See code example |
| Screen | The canvas element used for rendering | Created at runtime |
| Screen Context | The 2D drawing context obtained from the canvas | Obtained at runtime |
Some values are null because they will be either calculated or defined at runtime. Values could be in separate variables, but I put them in an object to keep things organised.
let data = {
    screen: {
        width: 640,
        height: 480,
        halfWidth: null,
        halfHeight: null
    },
    render: {
        delay: 30
    },
    rayCasting: {
        incrementAngle: null,
        precision: 64
    },
    player: {
        fov: 60,
        halfFov: null,
        x: 2,
        y: 2,
        angle: 90
    },
    map: [
        [1,1,1,1,1,1,1,1,1,1],
        [1,0,0,0,0,0,0,0,0,1],
        [1,0,0,0,0,0,0,0,0,1],
        [1,0,0,1,1,0,1,0,0,1],
        [1,0,0,1,0,0,1,0,0,1],
        [1,0,0,1,0,0,1,0,0,1],
        [1,0,0,1,0,1,1,0,0,1],
        [1,0,0,0,0,0,0,0,0,1],
        [1,0,0,0,0,0,0,0,0,1],
        [1,1,1,1,1,1,1,1,1,1],
    ]
}
For calculated values we will define these after the object is defined
// Calculated data
data.screen.halfWidth = data.screen.width / 2;
data.screen.halfHeight = data.screen.height / 2;
data.rayCasting.incrementAngle = data.player.fov / data.screen.width;
data.player.halfFov = data.player.fov / 2;
Canvas
We use the canvas to draw the projection. We will create it at runtime, though it can also be created in the HTML.
This code creates the canvas with the specified attributes above:
// Canvas
const screen = document.createElement('canvas');
screen.width = data.screen.width;
screen.height = data.screen.height;
screen.style.border = "1px solid black";
document.body.appendChild(screen);

// Canvas context
const screenContext = screen.getContext("2d");
Utils
To create the raycasting logic we will need to use some trig funcs, like Math.sin() etc.
These funcs work with radian values, not degrees, but we are using degree values so first we need to create a func that converts degree values into radian values.
The formula is
degree * π / 180
With that as the base we can create this function
/**
 * Cast degree to radian
 * @param {Number} degree
 */
function degreeToRadians(degree) {
    let pi = Math.PI;
    return degree * pi / 180;
}
As I previously mentioned all we are doing is drawing lines on the canvas, to simplify our job we will create a function to draw these lines
/**
 * Draw line into screen
 * @param {Number} x1
 * @param {Number} y1
 * @param {Number} x2
 * @param {Number} y2
 * @param {String} cssColor
 */
function drawLine(x1, y1, x2, y2, cssColor) {
    screenContext.strokeStyle = cssColor;
    screenContext.beginPath();
    screenContext.moveTo(x1, y1);
    screenContext.lineTo(x2, y2);
    screenContext.stroke();
}
We now have everything we need to start our raycasting logic
Game Cycle
The raycasting projection needs to be redrawn every render iteration. We will create a simple thing that will be just the loop render creation and the most important function of this whole thing
Le Raycasting Function
/**
 * Raycasting logic
 */
function rayCasting() {}
We dont have the logic yet but that coming dw
Another thing we will need is a clear screen function, simple stuff
/**
 * Clear screen
 */
function clearScreen() {
    screenContext.clearRect(0, 0, data.screen.width, data.screen.height);
}
Good good, now we need to create the main() function that will be our main loop. We will need an interval to create a render thread
Use the renderDelay data value from our attributes to be the delay for every render cycle iteration
After creating the function we can call it where it will be the start function of the code
// Start
main();

/**
 * Main loop
 */
function main() {
    setInterval(function() {
        clearScreen();
        rayCasting();
    }, data.render.delay);
}
Raycasting
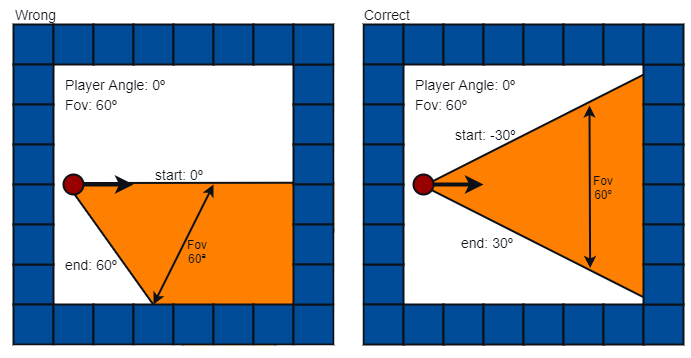
To start our logic we need to know some concepts with the player angle, player FOV and the screen width
The first thing we need to know is that each ray needs to be thrown in relation of the player angle and the FOV. The player FOV is 60º but the player focus is in the middle of the FOV. Because we have to start the raycasting in -30º of the player angle.
Inside our rayCasting() function, we can get the actual ray angle with this code
function rayCasting() {
    let rayAngle = data.player.angle - data.player.halfFov;
}
After it, we will start the cast of the rays. Remember that we have to iterate all the screen slices, so we will use the screen width to do this. For each iteration the rayAngle variable needs to be incremented to iterate the entire player FOV, we will use the data.rayCasting.incrementAngle to do it
function rayCasting() {
    let rayAngle = data.player.angle - data.player.halfFov;

    for(let rayCount = 0; rayCount < data.screen.width; rayCount++) {

        // ...

        // Increment
        rayAngle += data.rayCasting.incrementAngle;
    }
}
The next step will be created inside the ray loop, and before the ray angle increment.
The first coordinates of the ray match the player coordinates. We will create an object with these values to stay organised.
// Ray data
let ray = {
    x: data.player.x,
    y: data.player.y
}
To discover the next coordinates of the actual ray, we have to calculate this based on the ray angle, for this step we will use the trig functions. These funcs will give us the increment values to give for the ray to follow forward. In this step we will use the precision attribute too, to control the interval of each position of the ray. The sin and cos give us float values, but we can divide these values with the precision to turn these values smaller.
Note that the higher the precision, more checkings will be executed and more positions of the ray we will have. We will not use a DDA algorithm that is used to find just the intersections in the grid. To focus making the simplest way.
Also note that we will be using our degreeToRadians() function here
// Ray path incrementers
let rayCos = Math.cos(degreeToRadians(rayAngle)) / data.rayCasting.precision;
let raySin = Math.sin(degreeToRadians(rayAngle)) / data.rayCasting.precision;
The next step is the wall checking. We have to increment the rayCos and raySin to x and y ray coordinates until we find a wall in the map. So, in this step we need a loop.
Note: remember that the matrix positions are represented in integer coordinates, the ray positions incremented with the cos and sin will be float values and we need to convert these values to integer type. We use Math.floor() for this
// Wall checking
let wall = 0;
while(wall == 0) {
    ray.x += rayCos;
    ray.y += raySin;
    wall = data.map[Math.floor(ray.y)][Math.floor(ray.x)];
}
When the ray collides with some wall, the loop will be stopped and we will have the ray coordinates updated with the wall position. The RayCasting distance is calculated in this step, to know the strip size that we will need to draw. If the wall is near, the distance will be lower and then the line drawn will be bigger. If the wall is far, the distance will be bigger and the drawn line will be smaller.
For this distance calc we will use the pythagoras theorem. This formula will be used with the player coordinates and the wall coordinates.
Pythagoras Theorem: a² + b² = c²
Formula: distance² = (player x - ray x)² + (player y - ray y)²
Code: Math.sqrt( Math.pow( data.player.x - ray.x, 2 ) + Math.pow( data.player.y - ray.y, 2 ) );
The code will be
// Pythagoras theorem
let distance = Math.sqrt(Math.pow(data.player.x - ray.x, 2) + Math.pow(data.player.y - ray.y, 2));
With the distance we have to define the wall height, the wall height will be used to draw the strip in the canvas. We cannot use the distance directly because we need to reverse the value. The bigger the distance the smaller the strip.
To reverse the value we can divide the distance value with the data.screen.halfHeight. This value will define the same size for the width, height and length.
Note: The wallHeight value will be used to draw the strip in the canvas. The canvas coordinates are represented with an integer type, so we need to convert again using Math.floor(), the canvas drawer does accept float values but in our case it will not be good practice.
// Wall height
let wallHeight = Math.floor(data.screen.halfHeight / distance);
The wall height will be used to draw the stripes. This step is divided into three operations
- Draw the ceiling (From screen top to screen half height minus wall height)
- Draw the wall (From screen half height minus wall height to screen half height plus wall height)
- Draw the floor (From screen half height plus wall height to screen bottom)

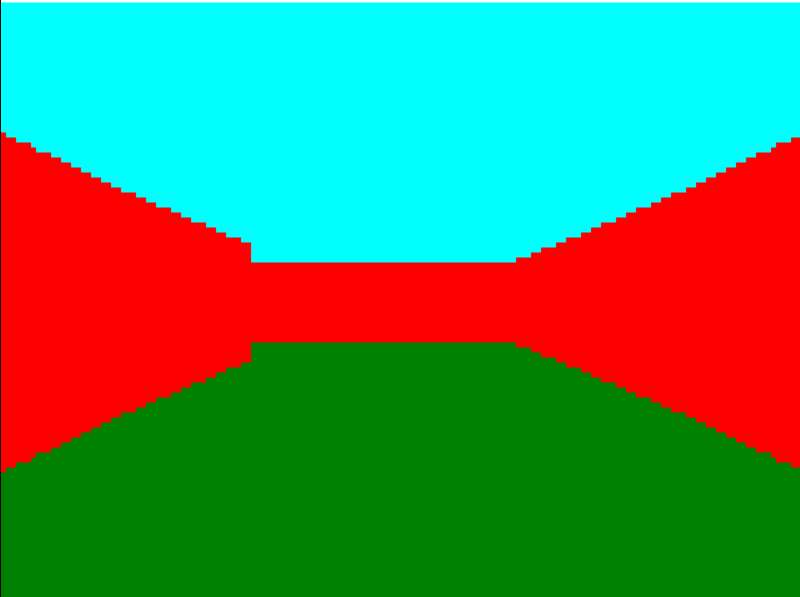
We will use preset colours, and we will use the drawLine() func we created earlier too
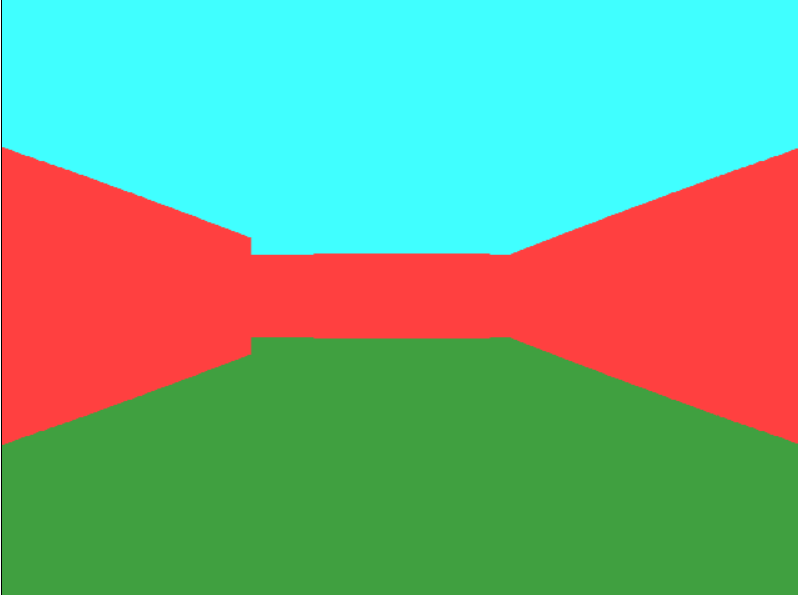
// Draw
drawLine(rayCount, 0, rayCount, data.screen.halfHeight - wallHeight, "cyan");
drawLine(rayCount, data.screen.halfHeight - wallHeight, rayCount, data.screen.halfHeight + wallHeight, "red");
drawLine(rayCount, data.screen.halfHeight + wallHeight, rayCount, data.screen.height, "green");
Entire code
/**
 * Raycasting logic
 */
function rayCasting() {
    let rayAngle = data.player.angle - data.player.halfFov;
    for(let rayCount = 0; rayCount < data.screen.width; rayCount++) {

        // Ray data
        let ray = {
            x: data.player.x,
            y: data.player.y
        }

        // Ray path incrementers
        let rayCos = Math.cos(degreeToRadians(rayAngle)) / data.rayCasting.precision;
        let raySin = Math.sin(degreeToRadians(rayAngle)) / data.rayCasting.precision;

        // Wall finder
        let wall = 0;
        while(wall == 0) {
            ray.x += rayCos;
            ray.y += raySin;
            wall = data.map[Math.floor(ray.y)][Math.floor(ray.x)];
        }

        // Pythagoras theorem
        let distance = Math.sqrt(Math.pow(data.player.x - ray.x, 2) + Math.pow(data.player.y - ray.y, 2));

        // Wall height
        let wallHeight = Math.floor(data.screen.halfHeight / distance);

        // Draw
        drawLine(rayCount, 0, rayCount, data.screen.halfHeight - wallHeight, "cyan");
        drawLine(rayCount, data.screen.halfHeight - wallHeight, rayCount, data.screen.halfHeight + wallHeight, "red");
        drawLine(rayCount, data.screen.halfHeight + wallHeight, rayCount, data.screen.height, "green");

        // Increment
        rayAngle += data.rayCasting.incrementAngle;
    }
}
We now have basic raycasting working.
Basic Movement
To create player movement, we will use event listeners. An event listener will be attached to the document to check when a user presses a keyboard key. We will listen for W, A, S, and D.
First thing to do is to add new attributes to our data. The first attributes are the itentifier of the keys
// Data
let data = {
    // ...
    key: {
        up: "KeyW",
        down: "KeyS",
        left: "KeyA",
        right: "KeyD"
    }
}
The second attributes are the speed of the player, there are two types, move speed and rotation speed. Both are used for the movement logic, ofc
let data = {
    // ...
    player: {
        // ...
        speed: {
            movement: 0.5,
            rotation: 5.0
        }
    }
}
So now we have to actually create the movement logic, this is what each key will do
| Key | Action |
|---|---|
| W (up) | Use the player's angle to calculate sin and cos; move player forward. |
| S (down) | Use the player's angle to calculate sin and cos; move player backward. |
| A (left) | Rotate the player's angle to the left (decrease angle). |
| D (right) | Rotate the player's angle to the right (increase angle). |
Note that for up and down we need to get the sin and cos values from the player angle to discover that is the value we need to increment/decrement by for the player coordinates. If we just increment the coordinates without checking the angle, the player will not go in the view position in relation of the angle but rather always in the same direction.
To create the key event, we will put the listener to the document of the page. The event we will use for this step is keydown.
/**
 * Movement Event
 */
document.addEventListener('keydown', (event) => {
});
After the event initialisation, we will get the key code that was pressed, the key code will be inside the event parameter. The code is represented as a string, the same string of our data.key attribute. The second thing is to check what the key pressed actuall was, and do the logic in relation to the table above.
/**
 * Movement Event
 */
document.addEventListener('keydown', (event) => {
    let keyCode = event.code;

    if(keyCode === data.key.up) {

    } else if(keyCode === data.key.down) {

    } else if(keyCode === data.key.left) {

    } else if(keyCode === data.key.right) {

    }
});
For up and down logic, we need to get the sin and cos of the player angle to discover the player direction and what we need to increment for the player coordinates to move the player. In this step we will multiply the sin and cos values with the player movement speed.
Note: Remember to convert to radians first.
// ...
if(keyCode === data.key.up) {
    let playerCos = Math.cos(degreeToRadians(data.player.angle)) * data.player.speed.movement;
    let playerSin = Math.sin(degreeToRadians(data.player.angle)) * data.player.speed.movement;
    data.player.x += playerCos;
    data.player.y += playerSin;
} else if(keyCode === data.key.down) {
    let playerCos = Math.cos(degreeToRadians(data.player.angle)) * data.player.speed.movement;
    let playerSin = Math.sin(degreeToRadians(data.player.angle)) * data.player.speed.movement;
    data.player.x -= playerCos;
    data.player.y -= playerSin;
}
// ...
For the left and the right movement, we simply increment or decrement the angle of the player with the player rotation speed
// ...
} else if(keyCode === data.key.left) {
    data.player.angle -= data.player.speed.rotation;
} else if(keyCode === data.key.right) {
    data.player.angle += data.player.speed.rotation;
}
// ...
Nice, we can move, only issue is that there is no collision test, we can phase through the walls and cause an exception in our program. To create the collision logic, before you increment the player coordinates for the up and down logics we need to check if the new position of the player is a wall. If it is then we will not change the coordinates, if not then we change
// ...
if(keyCode === data.key.up) {
    let playerCos = Math.cos(degreeToRadians(data.player.angle)) * data.player.speed.movement;
    let playerSin = Math.sin(degreeToRadians(data.player.angle)) * data.player.speed.movement;
    let newX = data.player.x + playerCos;
    let newY = data.player.y + playerSin;

    // Collision test
    if(data.map[Math.floor(newY)][Math.floor(newX)] == 0) {
        data.player.x = newX;
        data.player.y = newY;
    }
} else if(keyCode === data.key.down) {
    let playerCos = Math.cos(degreeToRadians(data.player.angle)) * data.player.speed.movement;
    let playerSin = Math.sin(degreeToRadians(data.player.angle)) * data.player.speed.movement;
    let newX = data.player.x - playerCos;
    let newY = data.player.y - playerSin;

    // Collision test
    if(data.map[Math.floor(newY)][Math.floor(newX)] == 0) {
        data.player.x = newX;
        data.player.y = newY;
    }
}
// ...
Collisions implemented.
Fisheye Fix
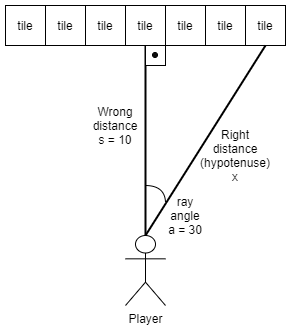
You can kinda see that the walls of the projections were kinda distorted. This occurs because the method to throw the ray that we used starts from the player, so the side rays will be more distant than the middle rays. This effect is called Fisheye. To correct it, we need to translate the distance of the rays removing the distorted distance in relation of the player.
Based on the first example, we can see the right triangle between the player position and the wall position. The angle values need to be processed to correct the distorted distance. To do this, we can use trigonometry.
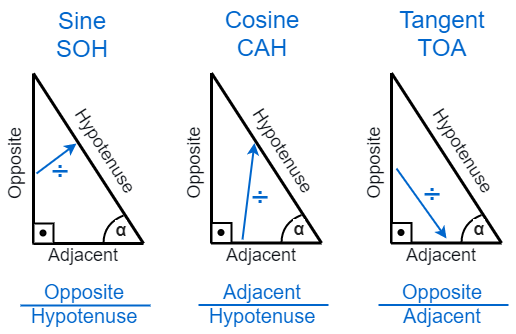
These are the trig formulas. And this is the situation we have
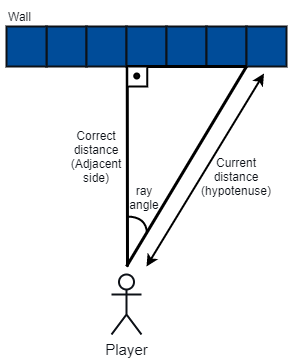
The view to the wall collision is a right triangle, the wrong distance is the hypotenuse, the angle of the ray, and the correct distance is the adjacent side (this is what we need to discover). We have the hypotenuse value and the angle, so we can use the cosine formula to find the adjacent
hypotenuse = 10
angle = 30
adjacent_side = x

// Formula
COS(angle) = adjacent_side / hypotenuse

// Rotate the formula to solve the problem
COS(angle) = adjacent_side / hypotenuse
COS(angle) * hypotenuse = (adjacent_side / hypotenuse) * hypotenuse // (Add multiplier)
COS(angle) * hypotenuse = adjacent_side // (Remove redundant)
adjacent_side = hypotenuse * COS(angle) // Right!
Note: remember to use radians sir
Ok, we have our formula, but there is a problem, the angle we used is the entire angle (player angle + ray angle), we have to use just the ray angle to get the correct adjacent side value (correct distance), so the formula in the code will be:
adjacent side = hypotenuse * COS(ray angle - player angle)
The formula will be applied after the get distance in rayCasting() func, code will be:
// ...

// Pythagoras theorem
let distance = Math.sqrt(Math.pow(data.player.x - ray.x, 2) + Math.pow(data.player.y - ray.y, 2));

// Fish eye fix
distance = distance * Math.cos(degreeToRadians(rayAngle - data.player.angle));

// Wall height
let wallHeight = Math.floor(data.projection.halfHeight / distance);

// ...
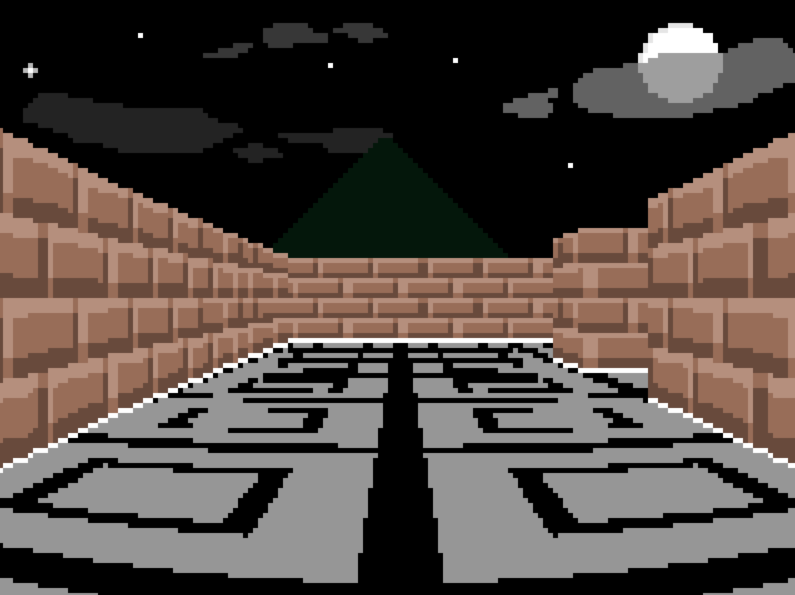
We now have basic raycasting working with movement. Well done.
Scale
Ok so far, we have drawn the lines in the entire screen but in the old games there arent good performance computers to render 640x480 images, so the stripes were drawn on a little panel and in the render step they were resized based on the scale for the original monoitor size. This method loses some quality but it can be very fast in relation of the computer performance. We will now render textures on the wall and so we will be using a lot more processing and so from now on we will need to use this scale projection.
For this step we will change some code parts, beginning from the attributes. We will create another object called projection that will have the correct render sizes and the screen will keep the original sizes like before. The canvas will have the original size but the logic of the code will use the projection size to draw the stripes.
The projection sizes will be defined using the new scale attribute of the screen object.
| Attribute | Description | Value |
|---|---|---|
| Projection width | The projection width calculated from the screen scale | Screen width / scale |
| Projection height | The projection height calculated from the screen scale | Screen height / scale |
| Projection half width | The half width of projection | Projection width / 2 |
| Projection half height | The half height of projection | Projection height / 2 |
| Screen scale | The scale of the screen | 1 to n |
In the code the attributes are
// Data
let data = {
    screen: {
        // ...
        scale: 4
    },
    projection: {
        width: null,
        height: null,
        halfWidth: null,
        halfHeight: null
    },
// ...
We use null values for the projection because these values will be calculated based on screen attributes. Now, we will make the calcs of the attributes created before. Another thing we will do is define the incrementAngle of the rays of RayCasting to consider the projection width
// Calculated data
// ...
data.projection.width = data.screen.width / data.screen.scale;
data.projection.height = data.screen.height / data.screen.scale;
data.projection.halfWidth = data.projection.width / 2;
data.projection.halfHeight = data.projection.height / 2;
data.rayCasting.incrementAngle = data.player.fov / data.projection.width;
Good, now we have to set the scale of the canvas to render the image wiht the correct size that we want. If we dont do this step, the rendered image will have the projection size. In the canvas creation step, we will add the scale configuration to the screen context. Also in this step, we will call the translate method from the context to set the definition for our lines. It will fix the lines with scale 1 because the canvas calculates from the half of a pixel to render the lines.
// Canvas context
const screenContext = screen.getContext("2d");
screenContext.scale(data.screen.scale, data.screen.scale);
screenContext.translate(0.5, 0.5);
In the rayCasting() function some parts need to be changed. The first part is the for loop of each ray. This loop considers the original width of the screen, but now we have to consider the projection width.
/**
 * Raycasting logic
 */
function rayCasting() {
    let rayAngle = data.player.angle - data.player.halfFov;
    for(let rayCount = 0; rayCount < data.projection.width; rayCount++) {
        // ...
    }
}
In the wallHeight variable, we need to use the half projection height to get the result so, and in the draw step we need to use the projection size too
// Wall height
let wallHeight = Math.floor(data.projection.halfHeight / distance);

// ...

// Draw
drawLine(rayCount, 0, rayCount, data.projection.halfHeight - wallHeight, "cyan");
drawLine(rayCount, data.projection.halfHeight - wallHeight, rayCount, data.projection.halfHeight + wallHeight, "red");
drawLine(rayCount, data.projection.halfHeight + wallHeight, rayCount, data.projection.height, "green");
To finish this step we will also change the clearScreen() function too, to make sure it uses the projection size:
/**
 * Clear screen
 */
function clearScreen() {
    screenContext.clearRect(0, 0, data.projection.width, data.projection.height);
}
Ok, scale done, see below how it looks with scale of 4
In Memory Textures
In this step we will draw the wall based on some texture. This texture will be written inside the code, so it will be an integer matrix, where each number will identify some colour. This is the concept of memory texture.
Note that we will not load external textures in this step to make our work easier, later on we will tho
To start, we will add some new attributes to our data. The new attribute will be a list of textures, and each list item will have some data of the textures like width, height, bitmap and colors list.
| Attribute | Description |
|---|---|
| Texture width | The width of the bitmap |
| Texture height | The height of the bitmap |
| Texture bitmap | The bitmap (integer matrix) of the texture |
| Texture colours | The list of the colours that correspond to the integer in the bitmap matrix position |
code:
// Data
let data = {
    // ...
    textures: [
        {
            width: 8,
            height: 8,
            bitmap: [
                [1,1,1,1,1,1,1,1],
                [0,0,0,1,0,0,0,1],
                [1,1,1,1,1,1,1,1],
                [0,1,0,0,0,1,0,0],
                [1,1,1,1,1,1,1,1],
                [0,0,0,1,0,0,0,1],
                [1,1,1,1,1,1,1,1],
                [0,1,0,0,0,1,0,0]
            ],
            colors: [
                "rgb(255, 241, 232)",
                "rgb(194, 195, 199)",
            ]
        }
    ]
}
This texture has an 8x8 dimension, but you can create bigger textures, you will just need more processing power to render them. This texture represents a brick wall.
This logic works in the rayCasting() function:
- Get the texture X position based on each thrown ray coordinates
- Change the wall drawing function so that it uses those texture colours
After discoveriring the wall height, we will get the coordinates of the texture based on ray coordinates. This is necessary to discover what is the texture strip that we will use to draw in our projection, we will have to multiply the position by the texture width to make the texture has the same wall width. After it, we will use the modulo operator to keep the x axis inside the texture width interval. For example:
- Ray coordinates
ray.x = 15andray.y = 23 - Texture size:
texture.width = 8 - Texture width position:
position = (ray.x + ray.y) * texture.widthposition = (15 + 23) * 8position = 304
- Texture interval offset:
position = position % texture.widthposition = 304 % 8position = 0
- The column
0of our texture will be used for the strip render
In our code, we will add these lines after getting the wall height value. The first line is for getting the texture that will be processed by the map integer value position. The second is the calculation to discover the x coordinate of the texture:
// ...

// Wall height
let wallHeight = Math.floor(data.projection.halfHeight / distance);

// Get texture
let texture = data.textures[wall - 1];

// Calcule texture position
let texturePositionX = Math.floor((texture.width * (ray.x + ray.y)) % texture.width);

// ...
After it we will create the function to draw the texture. The function will have a loop to iterate the texture height and some calcs to divide the texture height to discover the positions to draw the line. The params of the function are:
x: the x axis coordinate to draw the stripwallHeight: to know the strip heighttexturePositionX: The position x of the texture we calculated beforetexture: the texture we got from ray collide
/**
 * Draw texture
 * @param {*} x
 * @param {*} wallHeight
 * @param {*} texturePositionX
 * @param {*} texture
 */
function drawTexture(x, wallHeight, texturePositionX, texture) {
}
Now we will define two variables inside the function. The first variable is yIncrementer, to know what is the value we will increment to our y axis render cursor. The second is the y cursor that will be used to draw the line.
yIncrementer: This value is calculed based in the wallHeight. We have to divide the wall height by the texture height to discover what the value we will increment to our y cursor. Remender we need to multiply the wall height by 2 (two) because the wall height is defined based in the projection halfHeight.y: This is the render cursor. We divided the strip by the texture height and we will use this variable to control the position of the lines we need to draw to create our strip.
/**
 * Draw texture
 * @param {*} x
 * @param {*} wallHeight
 * @param {*} texturePositionX
 * @param {*} texture
 */
function drawTexture(x, wallHeight, texturePositionX, texture) {
    let yIncrementer = (wallHeight * 2) / texture.height;
    let y = data.projection.halfHeight - wallHeight;
}
Now we just need to create the loop to iterate the texture height and draw the strip lines using the cursor. Inside the loop, we need to get the colour that will be used for the strip. To get the colour, we will check the texture bitmap using the coordinates we have.
/**
 * Draw texture
 * @param {*} x
 * @param {*} wallHeight
 * @param {*} texturePositionX
 * @param {*} texture
 */
function drawTexture(x, wallHeight, texturePositionX, texture) {
    let yIncrementer = (wallHeight * 2) / texture.height;
    let y = data.projection.halfHeight - wallHeight;

    for(let i = 0; i < texture.height; i++) {
        screenContext.strokeStyle = texture.colors[texture.bitmap[i][texturePositionX]];
    }
}
All right, the next step is drawing the line. Now we have the colour, the strip cursor and the incrementer
/**
 * Draw texture
 * @param {*} x
 * @param {*} wallHeight
 * @param {*} texturePositionX
 * @param {*} texture
 */
function drawTexture(x, wallHeight, texturePositionX, texture) {
    let yIncrementer = (wallHeight * 2) / texture.height;
    let y = data.projection.halfHeight - wallHeight;

    for(let i = 0; i < texture.height; i++) {
        screenContext.strokeStyle = texture.colors[texture.bitmap[i][texturePositionX]];
        screenContext.beginPath();
        screenContext.moveTo(x, y);
        screenContext.lineTo(x, y + (yIncrementer + 0.5));
        screenContext.stroke();
        y += yIncrementer;
    }
}
Note that the plus value 0.5 in the yIncrementer is used to draw the line in the entire pixel. HTML5 canvas considers half a pixel for drawing, if you remove it the texture may show some white pixels after rendering
The last thing to do is just changing the wall drawing function of our rayCasting() function to use the drawTexture() function.
Textures
Ok we now have textures on the walls, now we will put image data on the walls. This shouldnt be hard, we will use almost all of the implemented things we did previously. Here, more functions will be created to get the image data and load it into memory.
Note: the image data is an array with the pixel values of some image. In HTML5 canvas image data, the pixels are positioned for each index of the array. For example, if we have a 1x1 image, the data of it would have a size of 4. the array would be [R, G, B, Alpha].
Important: u will get cors issue, make sure to start the code using a server not just opening the html file
Ok, the first thing to do is to import the iamge in the HTML DOM, this will guarantee that the image will be loaded when the page gets opened. The image we will use is the 16x16 image below:

We load it into the html like this
<!-- ... -->
<body>
    <img id="texture" src="texture.png" style="display: none">
</body>
<!-- ... -->
Note that we will need to hide the image, otherwise every texture that we import in and out of the app will appear in this page.
After it, we will define this image in our attributes, the texture session will be used for it too
// Data
let data = {
    // ...
    textures: [
        // ...
        {
            width: 16,
            height: 16,
            id: "texture",
            data: null
        }
    ]
}
The texture is in position 2 in the textures attribute, this means that the identifier for this texture is 2, so we have to change the map matrix to use this identifier for the walls:
// Data
let data = {
    // ...
    map: [
        [2,2,2,2,2,2,2,2,2,2],
        [2,0,0,0,0,0,0,0,0,2],
        [2,0,0,0,0,0,0,0,0,2],
        [2,0,0,0,0,0,0,0,0,2],
        [2,0,0,2,2,0,2,0,0,2],
        [2,0,0,2,0,0,2,0,0,2],
        [2,0,0,2,0,0,2,0,0,2],
        [2,0,0,2,0,2,2,0,0,2],
        [2,0,0,0,0,0,0,0,0,2],
        [2,0,0,0,0,0,0,0,0,2],
        [2,2,2,2,2,2,2,2,2,2],
    ],
    // ...
}
Check that the data is null. The data will be loaded in the loadTextures() function that we will create. After defining the texture, three new functions will be created. Check the table below for understanding about these functions
| Function | Description |
|---|---|
| loadTextures() | Iterate all textures defined in the textures attribute, and load the data of every texture |
| getTextureData(texture) | Get the pixel array of the texture. For this, we need to create a canvas in memory |
| parseImageData(imageData) | This function will transform the pixel array into CSS colour syntax |
The first function loadTextures() will iterate every texture we have and check the textures that is not in memory and load the data to it. To know if the texture is not in memory just check if there is an id property in the texture object.
/**
- Load textures */ function loadTextures() { for(let i = 0; i < data.textures.length; i++) { if(data.textures[i].id) { data.textures[i].data = getTextureData(data.textures[i]); } } }
After it, we will create the getTextureData(texture) function, this function requests the texture to get the image element in the DOM, and put this image in a canvas. This canvas is needed to get the pixel data. Directly from the image is not possible. The steps of this function are:
- Get the image element from DOM by texture.id
- Create a canvas with the texture dimensions
- Get the context of this canvas
- Draw the image in this canvas with the
drawImagefunction - Get the image data from the canvas with the
getImageData()function - Parse this image data with the function we will create after it
/**
 * Get texture data
 * @param {Object} texture
 */
function getTextureData(texture) {
    let image = document.getElementById(texture.id);
    let canvas = document.createElement('canvas');
    canvas.width = texture.width;
    canvas.height = texture.height;
    let canvasContext = canvas.getContext('2d');
    canvasContext.drawImage(image, 0, 0, texture.width, texture.height);
    let imageData = canvasContext.getImageData(0, 0, texture.width, texture.height).data;
    return parseImageData(imageData);
}
The last function we will need to create is the parseImageData(imageData) function. This function is necessary to parse the image data array format to our format so its easier to manipulate. We have to iterate each image data array index and create our array with css colour syntax.
/**
 * Parse image data to a css rgb array
 * @param {array} imageData
 */
function parseImageData(imageData) {
    let colorArray = [];
    for (let i = 0; i < imageData.length; i += 4) {
        colorArray.push(`rgb(${imageData[i]},${imageData[i + 1]},${imageData[i + 2]})`);
    }
    return colorArray;
}
Nice, the next thing to do is to change the drawTexture() function to check if the image is in memory or if this then from file. To check it, again we can check if the texture object has the id property. If it has, we will get the colour from the texture.data property, otherwise we will keep the way we get the colours from in memory textures.
function drawTexture(x, wallHeight, texturePositionX, texture) {
    // ...
    for(let i = 0; i < texture.height; i++) {
        if(texture.id) {
            screenContext.strokeStyle = texture.data[texturePositionX + i * texture.width];
        } else {
            screenContext.strokeStyle = texture.colors[texture.bitmap[i][texturePositionX]];
        }
        // ...
    }
}
Note: to get the index in array from matrix coordinates, we can use the x + y = matrix.length formula. This is applied in contexts that we have X and Y coordinates and a 1D array instead of a 2D array (matrix).
To avoid the RayCasting running without the iamge loaded, we will have to put the loadTextures() and main() function calls in the window.onload() event. This will guarantee that the algorithm will start after every image has been loaded.
// Start
window.onload = function() {
    loadTextures();
    main();
}
Intermediary Movement
Currently we have simple logic that just considers one key to move the player. In this step we will improve that logic to make the movement function consider multiple keys to move the player simultaneously. This is easy and simple to understand.
The logic is a little different than the other movement logic we use. Here, we will use two key events: keyup and keydown. Both events will control the key activation. When the user presses some key, this key will be marked as activated and the movement function will move the player. When the same key stops to be pressed, this key will be marked as not activated, so the movement function will not move the player. We will work with boolean controlling in this step for the keys.
First lets add the boolean property
// Data
let data = {
    // ...
    key: {
        up: {
            code: "KeyW",
            active: false
        },
        down: {
            code: "KeyS",
            active: false
        },
        left: {
            code: "KeyA",
            active: false
        },
        right: {
            code: "KeyD",
            active: false
        }
    }
    // ...
}
After, define the attributes, we will change the logic of our keydown event function. This event will just activate the pressed key. Note that we will change the if instruction to not consider else
/**
 * Key down check
 */
document.addEventListener('keydown', (event) => {
    let keyCode = event.code;

    if(keyCode === data.key.up.code) {
        data.key.up.active = true;
    }
    if(keyCode === data.key.down.code) {
        data.key.down.active = true;
    }
    if(keyCode === data.key.left.code) {
        data.key.left.active = true;
    }
    if(keyCode === data.key.right.code) {
        data.key.right.active = true;
    }
});
Now we will do the same for the keyup event, but instead of activating the key, this step will de activate the released key
/**
 * Key up check
 */
document.addEventListener('keyup', (event) => {
    let keyCode = event.code;

    if(keyCode === data.key.up.code) {
        data.key.up.active = false;
    }
    if(keyCode === data.key.down.code) {
        data.key.down.active = false;
    }
    if(keyCode === data.key.left.code) {
        data.key.left.active = false;
    }
    if(keyCode === data.key.right.code) {
        data.key.right.active = false;
    }
});
So now, we have to create the movement logic again. For this we will create a new function called movePlayer(). This function will check the activated keys and make the player coordinates change. In this function we will not use the else keyword because the movement needs to be simultaneous.
/**
 * Movement
 */
function movePlayer() {
    if(data.key.up.active) {
        let playerCos = Math.cos(degreeToRadians(data.player.angle)) * data.player.speed.movement;
        let playerSin = Math.sin(degreeToRadians(data.player.angle)) * data.player.speed.movement;
        let newX = data.player.x + playerCos;
        let newY = data.player.y + playerSin;

        // Collision test
        if(data.map[Math.floor(newY)][Math.floor(newX)] == 0) {
            data.player.x = newX;
            data.player.y = newY;
        }
    }
    if(data.key.down.active) {
        let playerCos = Math.cos(degreeToRadians(data.player.angle)) * data.player.speed.movement;
        let playerSin = Math.sin(degreeToRadians(data.player.angle)) * data.player.speed.movement;
        let newX = data.player.x - playerCos;
        let newY = data.player.y - playerSin;

        // Collision test
        if(data.map[Math.floor(newY)][Math.floor(newX)] == 0) {
            data.player.x = newX;
            data.player.y = newY;
        }
    }
    if(data.key.left.active) {
        data.player.angle -= data.player.speed.rotation;
    }
    if(data.key.right.active) {
        data.player.angle += data.player.speed.rotation;
    }
}
A new correction we will do in this function is validate the player angle interval. The angle in degrees has a fixed interval from 1 to 360. This needs to be checked in the left or right movements. When the angle overflows the angle interval needs to be corrected. To keep the value inside the interval we will use the modulo operator.
// ...
if(data.key.left.active) {
    data.player.angle -= data.player.speed.rotation;
    data.player.angle %= 360;
}
if(data.key.right.active) {
    data.player.angle += data.player.speed.rotation;
    data.player.angle %= 360;
}
// ...
If you test the app now you will notice that the player moves quite quickly, it is because for every loop iteration we are processing the player movement. It is not just in the event time. To change it, we will just change the players speed.
// Data
let data = {
    // ...
    player: {
        // ...
        speed: {
            movement: 0.05,
            rotation: 3.0
        }
    }
    // ...
}
Intermediary Collision Detection
In our movePlayer() function we detect the collision just checking the new player coordinates in relation of the map to discover if there is a wall in this new position. This is the simplest collision detection logic, it is not good for the player because if he collides with any wall position he will be stopped. This method we implement here will make the player slide in the walls. We will control the X and Y player position seperately, the logic is
- Check the map position with newY and oldX to discover if we can increment the Y position of the player
- Check the map position with oldY and newX to discover if we can increment the X position of the player
For example, if the player collides with some left wall, the oldY and newX checking will discover the wall, and the Y player position will be incremented only.
The other things we will do in this step is to create the player radius to define a min distance between the player and the wall. In this actual implementation, the distance between both is the minimum possible and it doesnt look good for playing
The first step is to create a new attribute called radius. We will use the value 0.3 because our map tiles are 1x1. If we used 10, we would be checking for walls in a different time zone.
// Data
let data = {
    // ...
    player: {
        // ...
        radius: 0.3,
    // ...
    }
}
After it we will change the movePlayer() function to make the new check collision logic. The first thing is to create the checking variables. These checking variables will have the new position of the player multiplied with the radius of the player to check the correct position.
/**
 * Movement
 */
function movePlayer() {
    if(data.key.up.active) {
        let playerCos = Math.cos(degreeToRadians(data.player.angle)) * data.player.speed.movement;
        let playerSin = Math.sin(degreeToRadians(data.player.angle)) * data.player.speed.movement;
        let newX = data.player.x + playerCos;
        let newY = data.player.y + playerSin;
        let checkX = Math.floor(newX + playerCos * data.player.radius);
        let checkY = Math.floor(newY + playerSin * data.player.radius);
        // ...
    }
    // ...
}
Note: see that we will just need to correct the up and down movements, left and right will just change the player angle and doesnt have anything to do with the collision detection logic.
After we have the checkX and checkY variables, we will check these positions seperately to discover what we can increment for the player position.
/**
 * Movement
 */
function movePlayer() {
    if(data.key.up.active) {
        let playerCos = Math.cos(degreeToRadians(data.player.angle)) * data.player.speed.movement;
        let playerSin = Math.sin(degreeToRadians(data.player.angle)) * data.player.speed.movement;
        let newX = data.player.x + playerCos;
        let newY = data.player.y + playerSin;
        let checkX = Math.floor(newX + playerCos * data.player.radius);
        let checkY = Math.floor(newY + playerSin * data.player.radius);

        // Collision detection
        if(data.map[checkY][Math.floor(data.player.x)] == 0) {
            data.player.y = newY;
        }
        if(data.map[Math.floor(data.player.y)][checkX] == 0) {
            data.player.x = newX;
        }
    }
    // ...
}
This is the implementation of the logic we checked before. Do the same thing for the down step but dont forget to minus the increment values.
/**
 * Movement
 */
function movePlayer() {
    // ...
    if(data.key.down.active) {
        let playerCos = Math.cos(degreeToRadians(data.player.angle)) * data.player.speed.movement;
        let playerSin = Math.sin(degreeToRadians(data.player.angle)) * data.player.speed.movement;
        let newX = data.player.x - playerCos;
        let newY = data.player.y - playerSin;
        let checkX = Math.floor(newX - playerCos * data.player.radius);
        let checkY = Math.floor(newY - playerSin * data.player.radius);

        // Collision detection
        if(data.map[checkY][Math.floor(data.player.x)] == 0) {
            data.player.y = newY;
        }
        if(data.map[Math.floor(data.player.y)][checkX] == 0) {
            data.player.x = newX;
        }
    }
    // ...
}
Focus Control
Here we will create simple logic to guarantee that the render process stop when the page loses focus. This is important because we are working with the web browser and if we keep our application running, this can impact system performance. This one is super easy
Here we will focus on two events: blur and onclick. The blur event is triggered when the element loses focus. This event will be used to put the application on standby. The onclick event will be triggered when the user clicks in this element. This event will be used to turn the application on again
The first thing we will do is create a variable that will reference the interval we defined in the main() function. This is necessary because we will need to start/stop this interval. After we define it, we will set this variable with the interval we created.
// Main loop
let mainLoop = null;

// ...

/**
 * Main loop
 */
function main() {
    mainLoop = setInterval(function() {
        clearScreen();
        movePlayer();
        rayCasting();
    }, data.render.delay);
}
Now, we will create the two events we checked before. The first is the blur event, we will set this event in the window element for when the user gets out of the browser page, the event gets called and stops the render method. In this step we will have to:
- clear the main loop interval
- set the main loop to null
- render an overlap wth some message for the user
/**
 * Window focus lost event
 */
window.addEventListener('blur', function(event) {
    if(mainLoop != null) {
        clearInterval(mainLoop);
        mainLoop = null;
        renderFocusLost();
    }
});
Note: the renderFocusLost() function will be created just to render some feedback for the user about the focus lost.
The second event is onclick. We will define this event for the screen element. The screen element is our canvas so, we will define that the user will need to click in the screen to turn the application on again. Remember we need to check if the mainLoop is null, otherwise we will conflict the interval render logic if the user clicks in the screen with the window focused.
/**
 * Window focus
 */
screen.onclick = function() {
    if(!mainLoop) {
        main();
    }
}
The last thing to do is to render the overlap with some feedback to the user, in this step we will fill a transparent black rect in the full screen, and we will show some message to the user.
/**
 * Render focus lost
 */
function renderFocusLost() {
    screenContext.fillStyle = 'rgba(0,0,0,0.5)';
    screenContext.fillRect(0, 0, data.projection.width, data.projection.height);
    screenContext.fillStyle = 'white';
    screenContext.font = '10px Lucida Console';
    screenContext.fillText('CLICK TO FOCUS', 37, data.projection.halfHeight);
}
Note: 37 is the position, centres the text, dependant on the font and text size
Advanced
Will be implementing a buffer, floor and ceiling casting too
Buffer
Most important part of this, so far we have done the simplest implementation possible, now with the buffer we will obtain optimal performance to render our application, it will enable us to use each pixel instead of processing intervals (lines). If we dont use biffer for pixel processing, the rendering will be very slow
The buffer is just image data that will be used for draws, and after every draw only the image that is in the buffer will be rendered. This array has 4 positions for every pixel we have, and each position represents the RGBA values. In this case, we will need to manipulate this array to draw the pixels inside. To know what is the correct position in relation of the projection as a matrix, we will use this formula to access the indexes.
Formula: index = 4 * (x + y * data.projection.width)
The multiplied 4 is the offset for the RGBA values and the y * data.projection.width is the offset for each y-axis position.
The first thing we will do is define the buffer, we will define two more attribbutes for our data.projection object. The first is the image data reference, and the second is the buffer.
Note: the image data is not the buffer. This is just some information we need in order to draw in the canvas. The buffer is the imageData.data that is the pixel array we will manipulate.
// Data
let data = {
    // ...
    projection: {
        // ...
        imageData: null,
        buffer: null
    }
    // ...
}
So now we will define the new attributes after the canvas creation. The imageData will be a created image of our screen context. The buffer will be the data of this image
// Buffer
data.projection.imageData = screenContext.createImageData(data.projection.width, data.projection.height);
data.projection.buffer = data.projection.imageData.data;
The next thing we will do is change the drawer functions. Note that there arent functions to draw lines, rects, etc, in the image data, so we will need to create it ourselves. The second thing we will create is a colour object with RGBA attributes
/**
 * Color object
 * @param {number} r
 * @param {number} g
 * @param {number} b
 * @param {number} a
 */
function Color(r, g, b, a) {
    this.r = r;
    this.g = g;
    this.b = b;
    this.a = a;
}
This is necessary because we will not use CSS colour representation anymore. The buffer works with integer values from 0 to 255.
For the first draw function, we will create a pixel drawer. This function will be called by drawPixel(x, y, color) and its job is to put the colour in the correct position of the buffer. In this step we will use the formula we have above.
/**
 * Draw pixel on buffer
 * @param {number} x
 * @param {number} y
 * @param {Color} color
 */
function drawPixel(x, y, color) {
    let offset = 4 * (Math.floor(x) + Math.floor(y) * data.projection.width);
    data.projection.buffer[offset  ] = color.r;
    data.projection.buffer[offset+1] = color.g;
    data.projection.buffer[offset+2] = color.b;
    data.projection.buffer[offset+3] = color.a;
}
After defining the first draw function we will change the implementation of the other drawer function. To make it easier we will re-create these functions to use the buffer. The first function we will create is drawLine(). The header of the new line drawer function will be drawLine(x, y1, y2, color).
Note that we do not define a second x value because in raycasting you do not need to draw diagonal lines.
This function will draw pixels from y1 to y2 in the x axis specified as the parameter. To do this we will need a for loop and we will use our new drawPixel() function.
/**
 * Draw line in the buffer
 * @param {Number} x
 * @param {Number} y1
 * @param {Number} y2
 * @param {Color} color
 */
function drawLine(x1, y1, y2, color) {
    for(let y = y1; y < y2; y++) {
        drawPixel(x1, y, color);
    }
}
After it, we will change the drawers of rayCasting() function to use the correct parameters of the new drawLine() function
// Draw
drawLine(rayCount, 0, data.projection.halfHeight - wallHeight, new Color(0, 0, 0, 255));
drawTexture(rayCount, wallHeight, texturePositionX, texture);
drawLine(rayCount, data.projection.halfHeight + wallHeight, data.projection.height, new Color(95, 87, 79, 255));
Notice that we have to change the implementation of the drawTexture() function too, so in this function we will call our drawLine() function instead of drawing the line with the native function
/**
 * Draw texture
 * @param {*} x
 * @param {*} wallHeight
 * @param {*} texturePositionX
 * @param {*} texture
 */
function drawTexture(x, wallHeight, texturePositionX, texture) {
    // ...
    let color = null;
    for(let i = 0; i < texture.height; i++) {
        // ...
        drawLine(x, y, Math.floor(y + (yIncrementer + 0.5)), color);
        y += yIncrementer;
    }
}
Note that the colour that the texture uses is the CSS format, we need to change it to use our Color object instead. In the parseImageData() function we will change it.
/**
 * Parse image data to a Color array
 * @param {array} imageData
 */
function parseImageData(imageData) {
    let colorArray = [];
    for (let i = 0; i < imageData.length; i += 4) {
        colorArray.push(new Color(imageData[i], imageData[i + 1], imageData[i + 2], 255));
    }
    return colorArray;
}
Now we need to render our buffer in our screen. For this we need to create the last function of this step called renderBuffer(). This function will be called from the main loop, after all of the process functions.
Important: We create the offscreen canvas once outside the loop. Creating it inside the loop would cause a massive memory leak.
// Offscreen buffer (optimisation)
const offscreenCanvas = document.createElement('canvas');
offscreenCanvas.width = data.projection.width;
offscreenCanvas.height = data.projection.height;
const offscreenContext = offscreenCanvas.getContext('2d');

/**
 * Render buffer
 */
function renderBuffer() {
    offscreenContext.putImageData(data.projection.imageData, 0, 0);
    screenContext.drawImage(offscreenCanvas, 0, 0);
}

/**
 * Main loop
 */
function main() {
    mainLoop = setInterval(function() {
        // ...
        renderBuffer();
    }, data.render.delay);
}
Nice, if you run now you will see that the image will be smoothed, to resolve it, we will disable this property of our screen context. The name of the property is imageSmoothingEnabled.
// Canvas context
// ...
screenContext.imageSmoothingEnabled = false;
Buffer is very important for the performance of the rendering, good stuff
Background
Background rendering is easy to implement, there is no mystery. First we need an image
Our image has to have the size in relation of the projection size. The background is drawn from the top fo the middle height in the screen, so the image height will have to be halg the height of our projection. The width of the image is in relation of the player angle, the value will be 360, because the image will repeat when the player does a full rotation. In this case the background image width: 360px, background image height 120px.

After obtaining our image, we will need to import this image in our HTML page. For it we will do the same thing we did to import the textures. Put the image file in our project root directory and reference it with the img tag.
<!-- ... -->
<body>
    <!-- ... -->
    <img id="background" src="background.png" style="display: none">
</body>
<!-- ... -->
So now, we have to define this image in our attributes. We will create the backgrounds key in our data object and after it we will define our background object inside with the width, height, id and data. The id will be the identified of the element in the HTML and the data will receive the pixel array of our image.
// Data
let data = {
    // ...
    backgrounds: [
        {
            width: 360,
            height: 60,
            id: "background",
            data: null
        }
    ]
}
After it, we will create the function that will be used to import the image data for our background. The function will do the same thing as the loadTextures() function. We will just need to change the properties, lets create the loadBackgrounds() function
/**
 * Load backgrounds
 */
function loadBackgrounds() {
    for(let i = 0; i < data.backgrounds.length; i++) {
        if(data.backgrounds[i].id) {
            data.backgrounds[i].data = getTextureData(data.backgrounds[i]);
        }
    }
}
Now we will call this function after calling the loadTextures() function.
// Start
window.onload = function() {
    loadTextures();
    loadBackgrounds();
    main();
}
Ok so now the background image will be imported, the next thing to do is to define the draw function for our backgrounds. This new function will replace the first draw function of the rayCasting() function. This draw function was used to draw the sky, but now, we will draw the sky with the background texture. Lets create the drawBackground() function!
/**
 * Draw the background
 * @param {number} x
 * @param {number} y1
 * @param {number} y2
 * @param {Object} background
 */
function drawBackground(x, y1, y2, background) {
}
Now we have to get the angle of the player to discover what is the x coordinate of the image we need to start to scan. This angle will be added with the x-axis parameters. We will call this variable an offset. The second thing to do is create the loop from y1 to y2, to make the line with the image pixels. Inside this loop we need to get the pixel from the image data.
/**
 * Draw the background
 * @param {number} x
 * @param {number} y1
 * @param {number} y2
 * @param {Object} background
 */
function drawBackground(x, y1, y2, background) {
    let offset = (data.player.angle + x);
    for(let y = y1; y < y2; y++) {
    }
}
Inside the loop we will need to define two variables that represent the coordinates of the image. When the player is with angle 0, the image will be drawn from x: 0 to x: 60. When the player is with angle 320 for example the image will be drawn from x: 320 to x: 20. For this case there is a repetition so, we will use the modulo operator to make the offset.
/**
 * Draw the background
 * @param {number} x
 * @param {number} y1
 * @param {number} y2
 * @param {Object} background
 */
function drawBackground(x, y1, y2, background) {
    let offset = (data.player.angle + x);
    for(let y = y1; y < y2; y++) {
        let textureX = Math.floor(offset % background.width);
        let textureY = Math.floor(y % background.height);
    }
}
After it we just need to get the colour from the image data and draw the pixel using drawPixel() function. The image data is an array, so we have to use the formula we learned to get the correct pixel.
Note that you have to use Math.floor() function to get the integer result value. If we dont use this, our application will throw an exception when we try to get the pixel of the image.
/**
 * Draw the background
 * @param {number} x
 * @param {number} y1
 * @param {number} y2
 * @param {Object} background
 */
function drawBackground(x, y1, y2, background) {
    let offset = (data.player.angle + x);
    for(let y = y1; y < y2; y++) {
        let textureX = Math.floor(offset % background.width);
        let textureY = Math.floor(y % background.height);
        let color = background.data[textureX + textureY * background.width];
        drawPixel(x, y, color);
    }
}
Nice, now with that function created we just need to call it instead of calling the drawLine() function inside our rayCasting() function
/**
 * Raycasting logic
 */
function rayCasting() {
    // ...

    // Draw
    drawBackground(rayCount, 0, data.projection.halfHeight - wallHeight, data.backgrounds[0]);
    drawTexture(rayCount, wallHeight, texturePositionX, texture);
    drawLine(rayCount, data.projection.halfHeight + wallHeight, data.projection.height, new Color(95, 87, 79, 255));

    // ...
}
Note: i used the constant data.backgrounds[0] reference, but we can define some attributes in our data object to reference the background that will be used for the current level for example.
Floorcasting
Floorcasting is the name of the technique to draw floors in raycasting projections by some texture.
There are some techniques (vertical strip render, horizontal strip render, etc...) that can be used to render the floorcasting, here we will use the easiest one however it is not the best technique since the processing used it not so optimised.
To make the floorcasting, we will start to iterate from the next pixel after the wall to the last pixel of the projection. For each pixel, we will calculate the distance of this pixel, and get the coordinates using this distance to discover the tile in the map. With the tile we can find the texture that will be used for this pixel.
For each pixel under the wall until the end of the projection the steps are:
- calculate the distance of this pixel
- calculate the coordinates by the distance
- find the tile in the map by the coordinates
- get the texture of this tile
- find the colour in this texture by the coordinates
- draw the pixel
It will be made for each column in the rendering processor (for each x coordinate). The image below explains a little bit about the iteration and the calculation to get the distance

The first thing to do in the code is to create the function to render the floor, and call this function instead of the drawLine() function we are currently calling to render the floor. The function will need as arguments the x coordinate to konw which column in the projection is the target, the wallHeight to know the position for the next pixel until the last pixel of the projection and the rayAngle to calculate the distance and the position of the tile.
/**
 * Floorcasting
 * @param {*} x1
 * @param {*} wallHeight
 * @param {*} rayAngle
 */
function drawFloor(x1, wallHeight, rayAngle) {
}
So now we will create the iteration between the pixels:
function drawFloor(x1, wallHeight, rayAngle) {
    start = data.projection.halfHeight + wallHeight + 1;
    for(y = start; y < data.projection.height; y++) {
    }
}
Good, now i will explain the formula we will use to calculate the distance of each pixel in the projection plane. This formula generates a distance value in the range of the pixel between the half height of the projection and the height of the projection. By knowing that the last pixel will have a distance of 1 because this pixel is the closest pixel to the player, and the pixel in the half height on the projection will have an infinite distance, we can make the range using this formula:
Formula: pixel distance = projection height / (2 * pixel_y - projection height)
Code: distance = data.projection.height / (2 * y - data.projection.height)
For example the formula will generate these values for a projection plane with height 20:
height = 20

pixel 11:  10.0
pixel 12:  5.0
pixel 13:  3.3333333333333335
pixel 14:  2.5
pixel 15:  2.0
pixel 16:  1.6666666666666667
pixel 17:  1.4285714285714286
pixel 18:  1.25
pixel 19:  1.1111111111111112
pixel 20:  1.0
Note that we didnt start to calculate the distance by the first pixel in the projection plane since the pixel in the middle of the height will have infinite distance, and the pixels before this will have negative distances. The floorcasting just renders the floor, so only the pixels after the rendered wall will be processed
Ok now lets code this maths part into our floorcasting code, the first thing to do is to calculate using the formula:
function drawFloor(x1, wallHeight, rayAngle) {
    start = data.projection.halfHeight + wallHeight + 1;
    for(y = start; y < data.projection.height; y++) {
        // Create distance and calculate it
        distance = data.projection.height / (2 * y - data.projection.height)
    }
}
Ok by knowing just the distance is not enough to get the position of the pixel in the map. We have to discover the location (x, y) of the pixel. To do this we can get cosine and sine values from the rayAngle to discover the incrementers (direction) to that location. So, before the loop starts, lets define the cos and sin of the ray. And after it we can just multiply these values with the distance to get the location of the casted floor.
function drawFloor(x1, wallHeight, rayAngle) {
    start = data.projection.halfHeight + wallHeight + 1;
    directionCos = Math.cos(degreeToRadians(rayAngle))
    directionSin = Math.sin(degreeToRadians(rayAngle))
    for(y = start; y < data.projection.height; y++) {
        // Create distance and calculate it
        distance = data.projection.height / (2 * y - data.projection.height)

        // Get the tile position
        tilex = distance * directionCos
        tiley = distance * directionSin
    }
}
Ok but it is still not working. We calculated the distance and the position from the zero coords, not relative from the player coords. To offset with the player coords and get the exact location, just sum the time coords with the player coords. This is necessary because if you are in the 0,0 position in the map, it will work fine, but if you move the player, the position of the floor will not be the same
function drawFloor(x1, wallHeight, rayAngle) {
    start = data.projection.halfHeight + wallHeight + 1;
    directionCos = Math.cos(degreeToRadians(rayAngle))
    directionSin = Math.sin(degreeToRadians(rayAngle))
    for(y = start; y < data.projection.height; y++) {
        // Create distance and calculate it
        distance = data.projection.height / (2 * y - data.projection.height)

        // Get the tile position
        tilex = distance * directionCos
        tiley = distance * directionSin
        tilex += data.player.x
        tiley += data.player.y
    }
}
Now we have the correct coords to get the tile in the map. So lets do that. To get the tile just access the map matrix and get by positions. To get the coords, we have to round our values with Math.floor(). After getting the tile, we will get the texture of this tile too. For guarantee, we will create a validation to avoid getting the wrong textures.
function drawFloor(x1, wallHeight, rayAngle) {
    start = data.projection.halfHeight + wallHeight + 1;
    directionCos = Math.cos(degreeToRadians(rayAngle))
    directionSin = Math.sin(degreeToRadians(rayAngle))
    for(y = start; y < data.projection.height; y++) {
        // Create distance and calculate it
        distance = data.projection.height / (2 * y - data.projection.height)

        // Get the tile position
        tilex = distance * directionCos
        tiley = distance * directionSin
        tilex += data.player.x
        tiley += data.player.y
        tile = data.map[Math.floor(tiley)][Math.floor(tilex)]

        // Get texture
        texture = data.floorTextures[tile]
        if(!texture) {
            continue
        }
    }
}
After getting the texture we have to get the colour. To get this, we will be sure to keep the values inside the range of the texture using mod operator and we will multiply the values by the texture size, to repeat by the correct size of the tile in the map. Again we have to remember the Math.floor() to cast the values to integer before getting the colour and to finish the Floorcasting, we just need to draw the colour into the projection by the x coordinate got from argument and the y coordinate from the for iterator
Note: remember that the texture colour array is not a matrix, so we need to calculate the coordinates position first using: x + y * width
// Get texture
// ...

// Define texture coords
texture_x = (Math.floor(tilex * texture.width)) % texture.width
texture_y = (Math.floor(tiley * texture.height)) % texture.height

// Get pixel color
color = texture.data[texture_x + texture_y * texture.width];
drawPixel(x1, y, color)
To start drawing the floor, lets import the texture like the other parts of the tutorial. For this, i created a new texture array in data object with the floor textures only, and i changed the loadTexture() function to load the floorTextures too/ the texture i used to test the floorcasting is the texture below

First i added it into the HTML file to load this
<body>
    <img id="texture" src="texture.png" style="display: none">
    <img id="background" src="background.png" style="display: none">
    <img id="tree" src="sprite.png" style="display: none">
    <img id="floor-texture" src="floor.png" style="display: none;"> <!-- Floor texture -->
</body>
After adding it, i changed the data with the new floorTextures array to organise the data of the algorithm
data = {
    // ...
    floorTextures: [
        {
            width: 16,
            height: 16,
            id: "floor-texture",
            data: null
        }
    ],
    // ...
}
And after this lets change the texture loader routine to load the floor textures too
/**
 * Load textures
 */
function loadTextures() {
    for(let i = 0; i < data.textures.length; i++) {
        if(data.textures[i].id) {
            data.textures[i].data = getTextureData(data.textures[i]);
        }
    }
    for(let i = 0; i < data.floorTextures.length; i++) {
        if(data.floorTextures[i].id) {
            data.floorTextures[i].data = getTextureData(data.floorTextures[i]);
        }
    }
}
So nice, now we just have to change the rayCasting() function to draw the floor, not just a line
// Draw
drawBackground(rayCount, 0, data.projection.halfHeight - wallHeight, data.backgrounds[0]);
drawTexture(rayCount, wallHeight, texturePositionX, texture);
drawFloor(rayCount, wallHeight, rayAngle)
Lets test the result
As you can see there is something going wrong, the first thing is the blank line after the wall. This happens because the routine that fix the "canvas half pixel" in html5. To fix it, we just need to increase the fix in the wall drawing function. This avoids that first pixel that will check in the floorcasting is a wall pixel.
function drawTexture(x, wallHeight, texturePositionX, texture) {
    // ...
    drawLine(x, y, Math.floor(y + (yIncrementer + 2)), color); // Changed to 2 instead of 0.5
    // ...
}
And the other big problem is that the floor has the same inverted fisheye effect. This happens because we are calculating the straight-line distance to the floor pixel on the screen, but our "eye" (the camera) is looking at an angle. To get the correct vertical distance (depth) for the floor tile mapping, we need to correct this perspective distortion.
We use the same cosine correction logic as before, but applied to the floor distance calculation.
Like the fisheye correction, lets fix the distance using SOH CAH TOA formula. The formula we can use to fix this is the cosine formula like below:
hypotenuse = x
angle = 30
adjacent_side = 10

// Formula
COS(angle) = adjacent_side / hypotenuse

// Rotate formula to solve the problem
COS(angle) = adjacent_side / hypotenuse
COS(angle) * hypotenuse = (adjacent_side / hypotenuse) * hypotenuse // (Add multiplier)
COS(angle) * hypotenuse = adjacent_side // (Remove redundant)
(COS(angle) * hypotenuse) / COS(angle) = adjacent_side / COS(angle) // (Add  divider)
hypotenuse = adjacent_side / COS(angle) // (Remove redundant) Right!
So now, we have the formula. To fix that we just need to apply this for the distance of the pixel. For the angle, we need to remember that this angle needs to be the angle of the ray, without the angle of the player, so, the code will be:
Formula: adjacent side = hypotenuse * COS(ray angle - player angle)
Code: distance = distance / Math.cos(degreeToRadians(rayAngle - data.player.angle))
Let's add this to the source code:
function drawFloor(x1, wallHeight, rayAngle) {
    // ...

    // Create distance and calculate it
    distance = data.projection.height / (2 * y - data.projection.height)
    distance = distance / Math.cos(degreeToRadians(rayAngle - data.player.angle)) // Inverse fisheye fix

    // ...
}
This is the result: